Restore Your Shower Flow: Replace & Descale Your Shower Head
By The FixDelivered Team · Updated 2026-09-18 · 7 min read
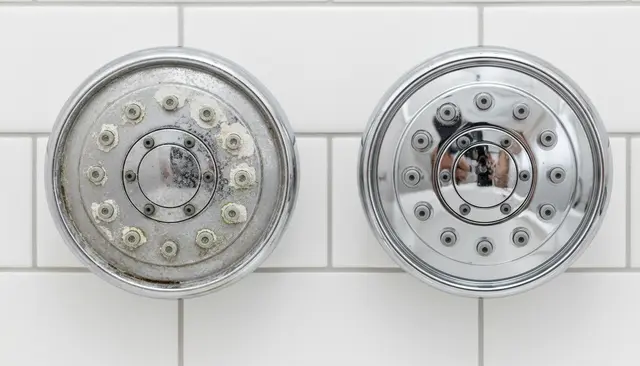
Is your daily shower becoming less invigorating and more of a dribble? A common culprit for weak water flow and poor spray patterns is a build-up of limescale and debris within your shower head. Fortunately, restoring your shower's former glory is often a straightforward task, either by descaling your existing shower head or replacing it entirely. This guide will walk you through both processes, helping you achieve a powerful, refreshing shower once more.
Why Descale or Replace Your Shower Head?
Over time, especially in hard water areas across the UK, limescale deposits can accumulate inside your shower head's nozzles and internal mechanisms. This build-up restricts water flow, leading to reduced pressure, an uneven spray pattern, and a generally less enjoyable showering experience. In some cases, the shower head might be old, cracked, or simply inefficient, making a replacement the more sensible option. Addressing these issues not only improves your shower but can also extend the life of your plumbing system by preventing further blockages.
How to Descale Your Shower Head: A Step-by-Step Guide
Descaling is a cost-effective way to restore your shower head's performance if it's suffering from limescale build-up. White vinegar is an excellent natural descaling agent.
Tools You'll Need:
- White vinegar (distilled)
- Old toothbrush or small brush
- Bucket, plastic bag, or sturdy container
- Rubber band (if using a bag)
- Cloth
Safety Precautions:
- While white vinegar is mild, avoid getting it in your eyes.
- Ensure the shower is turned off before you begin.
- Avoid using harsh chemical descalers unless specifically recommended for your shower head type, as they can damage finishes.
Step-by-Step Instructions:
- Prepare Your Descaling Solution: For most shower heads, undiluted white vinegar works best. If you prefer, you can dilute it slightly with water (e.g., 50/50 ratio), but stronger solutions are more effective for heavy limescale.
- Immerse the Shower Head:
- For removable shower heads: Unscrew the shower head from the hose or arm. Place it directly into a bucket or container filled with enough white vinegar to fully submerge the head.
- For fixed shower heads: Fill a sturdy plastic bag with white vinegar. Carefully position the bag around the shower head, ensuring the head is completely immersed in the vinegar. Use a rubber band or string to securely fasten the bag around the shower arm, preventing it from slipping and spilling.
- Soak for Several Hours: Allow the shower head to soak for at least 3-4 hours. For heavy limescale, leaving it overnight (8-12 hours) can be more effective. The vinegar will slowly dissolve the limescale.
- Scrub and Rinse: Remove the shower head from the vinegar solution. Use an old toothbrush or small brush to gently scrub away any remaining limescale from the nozzles and exterior. Once clean, thoroughly rinse the shower head under clean running water to remove all traces of vinegar and dislodged limescale.
- Reattach and Test: Screw the shower head back onto its hose or arm. Turn on the shower and check the water flow and spray pattern. You should notice a significant improvement.
When to Call a Professional:
- If, after descaling, the water flow remains poor, indicating a deeper issue within your shower valve or plumbing.
- If your shower head is permanently fixed and you're uncomfortable attempting the bag method or if it proves ineffective.
- If you suspect the low pressure is due to a problem with your home's main water supply, rather than just the shower head.
How to Replace Your Shower Head: A Step-by-Step Guide
Replacing a shower head is generally a simple DIY task that can instantly upgrade your shower's performance and aesthetics.
Tools You'll Need:
- New shower head (ensure it's compatible with your existing hose/arm – typically 1/2 inch BSP thread)
- Adjustable spanner or water pump pliers
- PTFE tape (plumber's tape)
- Cloth or soft towel
Safety Precautions:
- Ensure the shower is turned off before you begin.
- Be careful not to overtighten connections, as this can damage threads.
Step-by-Step Instructions:
- Turn Off the Shower: Make sure the shower is completely off and no water is running.
- Unscrew the Old Shower Head: Hold the shower arm (the pipe coming from the wall or ceiling) firmly with one hand to prevent it from twisting. With your other hand, grip the base of the old shower head where it connects to the arm or hose. Turn it anti-clockwise to unscrew it. If it's stiff, use an adjustable spanner, protecting the finish with a cloth if necessary.
- Clean the Shower Arm Thread: Once the old head is off, inspect the threads on the shower arm. Clean off any old PTFE tape or debris with a cloth.
- Apply PTFE Tape: Take your PTFE tape and wrap it around the threads of the shower arm in a clockwise direction (the same direction you'll be screwing on the new head). Wrap it 3-4 times, ensuring a snug, even layer. This helps create a watertight seal and makes future removal easier.
- Screw On the New Shower Head: Carefully align the new shower head with the threads on the shower arm. Begin to screw it on clockwise by hand. Make sure it's not cross-threaded.
- Tighten the Connection: Once hand-tight, give it another quarter to half a turn with your adjustable spanner. Be firm but do not overtighten, as this can strip the threads or crack the new shower head. The PTFE tape should provide a good seal without excessive force.
- Test for Leaks: Turn on your shower and check for any drips or leaks around the connection point. If you see any, tighten it slightly more, but remember not to overtighten.
When to Call a Professional:
- If the old shower head is seized and you can't remove it without risking damage to the shower arm or tiles.
- If the shower arm itself is loose, corroded, or damaged, requiring a more complex repair.
- If you encounter persistent leaks after fitting the new head that you cannot resolve.
- If you're upgrading to a more complex shower system (e.g., a thermostatic mixer shower, power shower, or a full shower enclosure) that requires significant plumbing work. A qualified plumber can assess your system and ensure safe installation. If you need help finding one quickly, you can find a local plumber through FixDelivered.
Choosing a New Shower Head
When replacing your shower head, consider the following:
- Type: Fixed, handheld, or a combination? Fixed heads offer a sleek look, while handhelds provide flexibility for rinsing.
- Flow Rate: Look for eco-friendly options with good flow ratings to save water and energy without compromising pressure. Many modern shower heads are designed to perform well even with lower flow rates.
- Compatibility: Most UK shower hoses and arms use a standard 1/2 inch BSP (British Standard Pipe) thread, so most shower heads are interchangeable.
- Finish: Match the finish to your existing bathroom fixtures for a cohesive look.
Maintenance Tips for a Healthy Shower
To keep your shower head performing at its best and minimise the need for frequent descaling or replacement:
- Wipe Regularly: After each shower, quickly wipe down the nozzles to prevent limescale from hardening.
- Occasional Soaks: If you're in a hard water area, consider a short vinegar soak every few months as a preventative measure, even if you don't notice issues.
- Consider a Water Softener: For persistent hard water problems throughout your home, a whole-house water softener can be a long-term solution.
By following these simple steps, you can significantly improve your shower's performance and extend the life of your fittings. Whether you opt for a thorough descale or a brand-new head, a powerful, refreshing shower awaits. If you encounter any difficulties or suspect a more complex issue with your plumbing, don't hesitate to seek expert help. Finding a qualified local plumber is easy with FixDelivered. Just tell us your emergency, and we'll help connect you with professionals who can get your shower running perfectly again. You can also learn more about how FixDelivered works.
Frequently asked questions
How often should I descale my shower head?
The frequency depends on your local water hardness. In hard water areas, descaling every 1-3 months is advisable. In soft water areas, every 6-12 months might suffice, or when you notice reduced flow or an uneven spray pattern.
What causes low shower pressure?
Low shower pressure can be caused by several factors, including limescale build-up in the shower head or hose, a partially closed stopcock, issues with your boiler or water heater, blockages in your pipes, or even external factors like low mains water pressure in your area. Descaling or replacing the shower head is a good first step to rule out the most common cause.
Can I replace my shower head myself?
Yes, replacing a standard shower head is typically a straightforward DIY task that most competent adults can complete with basic tools like an adjustable spanner and PTFE tape. Our guide provides clear, step-by-step instructions to help you through the process.
Need a plumber now? Tell us your emergency and FixDelivered will find and confirm an available local plumber near you, usually within the hour.
Written by the FixDelivered Team. Reviewed by Rupert Lowe, Editor. Last updated 2026-09-18.