How to Lag and Insulate Pipes to Prevent Freezing
By The FixDelivered Team · Updated 2026-09-08 · 5 min read
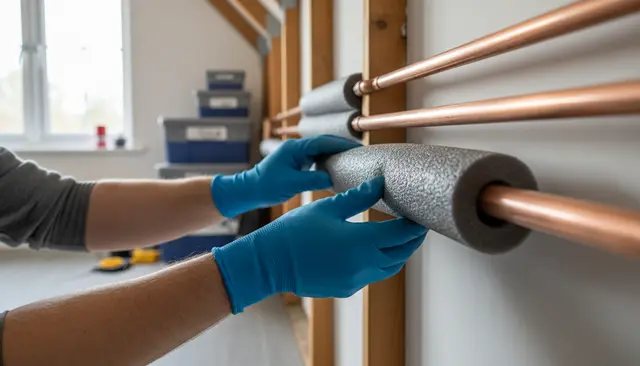
As winter approaches, the risk of frozen and burst pipes becomes a real concern for homeowners across the UK. A burst pipe can cause significant damage to your property, leading to costly repairs, insurance claims, and a huge amount of stress. The good news is that preventing this common winter woe is often a straightforward DIY task: lagging your pipes.
Why Lag Your Pipes?
Lagging, or insulating, your pipes is a proactive measure that offers several key benefits:
- Prevents Freezing: The primary reason is to protect pipes from freezing when temperatures drop below zero, especially in unheated areas like lofts, garages, and basements.
- Avoids Burst Pipes: When water freezes, it expands, putting immense pressure on pipework. This can cause pipes to split, leading to extensive water damage once the ice thaws. Repairing a burst pipe can cost anywhere from £200 to £500 for the plumber's call-out and fix, plus potentially thousands in water damage restoration.
- Reduces Heat Loss: Insulated hot water pipes retain heat more efficiently, meaning your boiler doesn't have to work as hard, potentially saving you money on energy bills.
- Reduces Condensation: Cold water pipes can sweat in warm, humid conditions, leading to condensation that can cause dampness and mould. Insulation helps to prevent this.
What You'll Need
Before you start, gather these essential tools and materials:
- Pipe Insulation: Available in various sizes and materials (see next section). Measure the diameter of your pipes to ensure you buy the correct size.
- Tape Measure: For accurate cutting.
- Utility Knife or Scissors: A sharp utility knife is best for clean cuts.
- Cable Ties or Insulation Tape: To secure the insulation firmly, especially at joints and bends.
- Gloves: To protect your hands, particularly if using mineral wool insulation.
- Torch or Headlamp: For working in dimly lit areas like lofts.
- Step Ladder or Stool: For reaching pipes at height.
Choosing the Right Pipe Insulation
The type of insulation you choose depends on the location and type of pipe:
- Foam Insulation (Polyethylene or Nitrile Rubber): This is the most common and easiest to use, typically pre-split along one side for easy fitting. It's suitable for most domestic internal pipework. Polyethylene is cost-effective, while nitrile rubber offers better thermal performance and durability.
- Mineral Wool: Often used for insulating larger pipes, boilers (external parts only), and hot water cylinders. It provides excellent thermal insulation but requires gloves and possibly a mask due to fibres. Remember, any work on the internal components of a boiler or gas pipework must ONLY be carried out by a Gas Safe registered plumber.
- Foil-backed Insulation: Good for outdoor pipes as it offers additional protection against UV rays and weathering.
- Self-Seal Insulation: Some foam insulation comes with an adhesive strip, making installation quicker and cleaner.
Ensure the insulation thickness is adequate for the level of protection needed. For pipes in unheated areas like lofts, thicker insulation (e.g., 25mm) is advisable.
Step-by-Step Guide to Lagging Pipes
Follow these steps for effective pipe insulation:
- Identify Pipes to Insulate: Focus on pipes in unheated areas: lofts, basements, garages, under floorboards near external walls, and exposed outdoor pipes. Both hot and cold water pipes in these areas should be insulated.
- Measure and Cut: Using your tape measure, cut the insulation to the required length for each section of pipe. For straight runs, cut pieces to fit snugly end-to-end.
- Fit the Insulation: If using pre-split foam, simply open it along the cut and push it firmly over the pipe. Ensure the split closes completely around the pipe.
- Secure the Insulation: Use cable ties or insulation tape every 30-50cm along the length of the pipe to hold the lagging firmly in place. Overlap the tape slightly for a good seal.
- Insulate Bends, Valves, and Joints: These are critical areas where heat can escape or freezing can occur. Cut insulation at an angle to create snug fits around bends, or use pre-formed bend pieces if available. For valves and complex joints, you may need to cut and mould smaller pieces of insulation, securing them thoroughly with tape. The goal is to leave no gaps.
- Check for Gaps: Once installed, run your hand along the entire length of the insulated pipework to feel for any gaps or areas where the insulation isn't fully closed. Seal these with extra tape.
Specific Areas to Insulate
- Lofts: All pipework, including the cold water storage tank and expansion tank, should be thoroughly insulated. Ensure insulation goes under the tanks too.
- Outside Walls: Pipes running along or through external walls are particularly vulnerable.
- Outdoor Taps: Consider fitting an outdoor tap cover for winter.
- Condensate Pipes: If your condensing boiler's condensate pipe runs externally, it's highly susceptible to freezing. Insulating this pipe is crucial for boiler operation, but if it freezes, never attempt to thaw it yourself if it's connected to the boiler's internal workings.
- Unheated Spaces: Garages, sheds, and basements where pipes are exposed to cold air.
When to Call a Professional
While lagging pipes is a great DIY project, there are times when it's best to call in a professional:
- Existing Frozen or Burst Pipes: If you already have a frozen pipe or, worse, a burst pipe, do not attempt to thaw or repair it yourself if you're unsure. Turn off your stopcock immediately and contact an expert. You can tell us your emergency and we'll connect you with a qualified local plumber fast.
- Difficult Access: If pipes are in extremely confined or hard-to-reach spaces, a professional plumber will have the tools and expertise to access and insulate them safely.
- Gas Pipes: Never attempt to insulate or interfere with gas pipes or any part of your boiler's internal system. This is dangerous and illegal unless you are a Gas Safe registered engineer.
- Uncertainty: If you're unsure about any aspect of the process or the type of insulation needed, it's always safer to consult a professional.
Final Thoughts
Lagging your pipes is a relatively inexpensive and simple task that can save you significant hassle and expense during the colder months. By following these steps, you can greatly reduce the risk of frozen and burst pipes, ensuring your home stays warm and dry all winter long. Should you ever need professional help with a plumbing emergency, remember FixDelivered can connect you with qualified local plumbers quickly. Find out more about how FixDelivered works.
Frequently asked questions
How cold does it have to be for pipes to freeze?
Pipes can begin to freeze when temperatures drop below 0°C (32°F). However, factors like wind chill, pipe exposure, and water flow can influence how quickly they freeze. Pipes in unheated areas are most vulnerable.
What type of insulation should I use for pipes in my loft?
For pipes in unheated lofts, it's best to use thicker foam insulation (e.g., 25mm polyethylene or nitrile rubber) to provide maximum protection against freezing. Ensure all pipes, including those for cold water tanks, are thoroughly covered.
Can I insulate gas pipes myself?
No, you should never attempt to insulate or interfere with gas pipes yourself. This work must ONLY be carried out by a Gas Safe registered engineer due to the serious safety risks involved.
How long does pipe insulation last?
Good quality foam pipe insulation, properly installed, can last for many years, typically 10-15 years or more. However, it's a good idea to inspect it periodically, especially in exposed areas, for signs of wear, damage, or degradation.
Need a plumber now? Tell us your emergency and FixDelivered will find and confirm an available local plumber near you, usually within the hour.
Written by the FixDelivered Team. Reviewed by Rupert Lowe, Editor. Last updated 2026-09-08.